Roll-a-Haring
Party
Keith Haring inspired interactive art project
Inquiry : How can we practice drawing like Keith Haring?
Subject: 3rd Grade Art
2-3 Class periods
Standards:
-
9.1.3.E. Demonstrate the ability to define objects, express emotions,
-
illustrate an action or relate an experience through creation of works in the
-
arts.
-
9.2.3. H. Identify, describe and analyze the work of Pennsylvania Artists in
-
dance, music, theatre and visual arts.
Objectives:
-
Understand how to make characters look like they’re moving by adding motion lines like
-
Keith Haring
-
Identify the work of Keith Haring and analyze how he used line and color to create his
-
very notable style
Assessment:
Students will be assessed as they work using the following guidelines.
1pt each – score 1-4
Did the student draw atleast 3 figures using the Roll-A-Haring Sheet?
Did the student color each figure in one color?
Did the student use sharpie to outline each figure?
Did the student add motion lines to indicate motion?
Materials
-
Powerpoint introducing Keith Haring
-
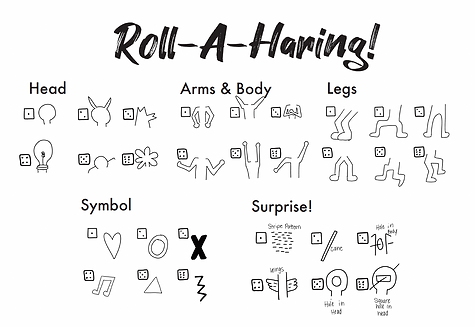
Roll-a-haring sheet for each table
-
2 Die for each table
-
11x14 Drawing Paper
-
Pencils
-
Erasers
-
Tempera Sticks
-
Thick Sharpies
Procedures:
Introduction:
Present powerpoint introducing artist including video about the artist
Quick class discussion about the artist review video contents
Questions to ask:
-
What type of art did Keith Haring do? Grafitti
-
Where was he from? Reading, PA
-
What are some of the key features of Keith Haring's artwork? Thick black outlines. bright colors, notable figures.
Roll-a-Haring project:
The teacher will demonstrate each step accordingly
-
Students will receive 11x14 paper to draw their figures on.
-
Using a dice, students will roll for each part of their figures. They will draw each part accordingly on the sheet, using whatever number they roll with the corresponding piece
-
Students will first draw in pencil to practice and allow for erasing
-
Students will repeat this with all 3 figures. If students have room on their paper, they may do more figures.
-
Once all the figures are done, students will add colors to the figures using tempera paint sticks
-
Ensuring one color per figure
-
Once color is added, students will add motion lines to figures to indicate motion.
-
Students will then add background
-
Once student finishes with lines and colors, they will go in with king size sharpies to add outlines.
-
Students will go over all background and motion lines with sharpie as well
Closing:
Students will clean up and answer review questions:
What is the name of this artist?
What type of art is this? (graffiti, street art)
Differentiation:
Students can create a different type of scene other than a party (superheroes, etc)
Modification:
Students can select shapes from sheet without rolling, doing shapes they feel more comfortable with.
Teach demonstrates. Some of the more difficult scenes
Extensions:
Student adds more characters as they would like.